Main

November 26, 2007

More about the Rosebud mittens

I got an email last week from a Finnish woman living in the area from where this mitten pattern is home. She had a lot of information on the pattern, and sent me two newspaper clippings on them. The pattern of Eeva Haavisto for these mittens has been published in the Ilkka magazine in 1985 and in 2001. With her help I also found two pictures on the net of the mittens

The pattern is originally from Kurikka, and the mittens are called Kurikka-rasat, rasa being a dialectical word for the Finnish word for mitten, lapanen. Kurikka is very close to Ilmajoki, where my pattern is from according to the museum’s archives. So I think we can conclude that the Rosebud pattern is the Kurikka mitten made in Ilmajoki, where the zigzags have been added. The original Kurikka mitten is not having these zigzags.

Kurikkarasat.jpg

Ilkka magazine 22.2.2001

There are several variations of the pattern around. One has the flower buds and the stripes going in opposite directions on left and right hand. One variation is to knit the inside of the hand not with flowers, but with stripes instead. The thumb can be knitted with stripes, and has also been knitted with a gusset and one single flower bud together with stripes and dots (see picture above). The traditional colours seams to be black (instead of green), white and red, but about 50 years ago it was also knitted on black background with phosphorus green leaves and purple buds. That must have been a colourful mitten.

In Kurikka there are still workshops held to teach the interested in how to knit the Kurikka mittens Talk about living traditions!

Here is a picture of the mittens with blue background and in the traditional black-white-red colours!

November 06, 2007

The Rosebud mittens - pattern and descriptions

Finishedrosebuds.jpg

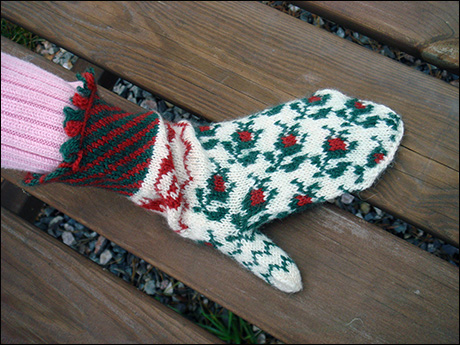
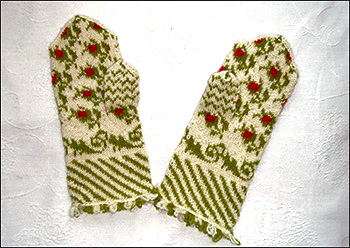
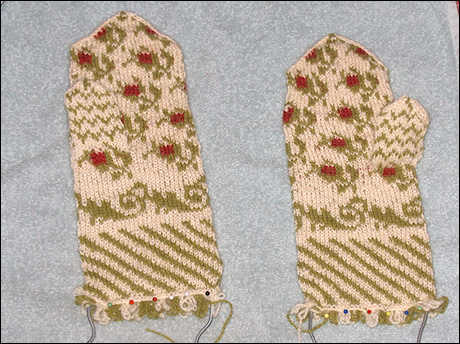
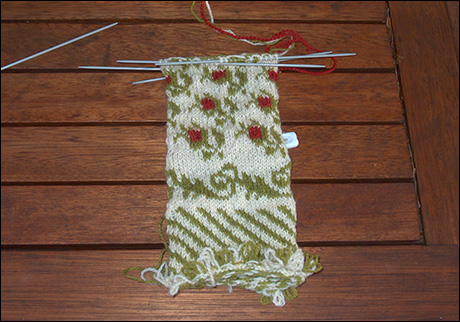
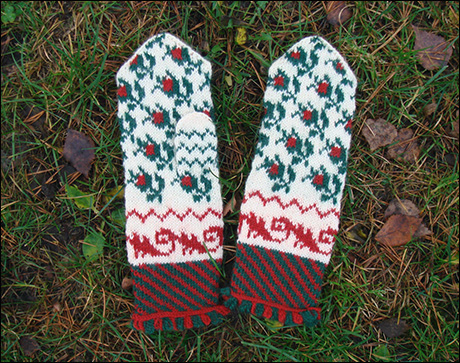
The Rosebud mittens have finally reached the point where I can publish a pattern for them, and give you all more details on them. The model for these mittens can be found in the collections of the Finnish National museum. The mittens are from Ilmajoki in Pohjanmaa in Finland. I have based my pattern on the drawings I made when I saw the picture of the mittens, and thus not having had the actual mittens in my hands, this is not an exact reproduction. The colours and the patterns of these mittens are more accurate than on the first pair of mittens I knitted in the end of last year.

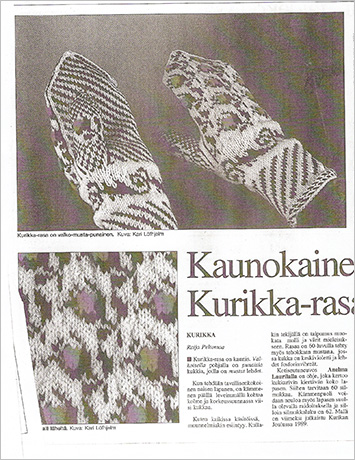
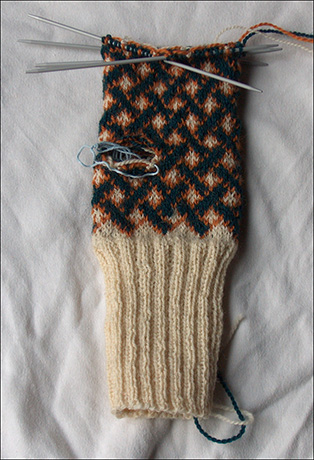
If you want to learn more about the pattern, that without the zigzags is called the Kurikka mitten, go here!

Rosebud3.jpg
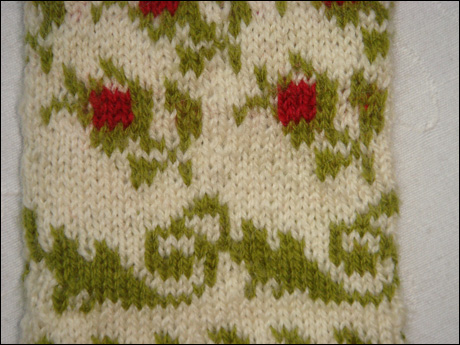
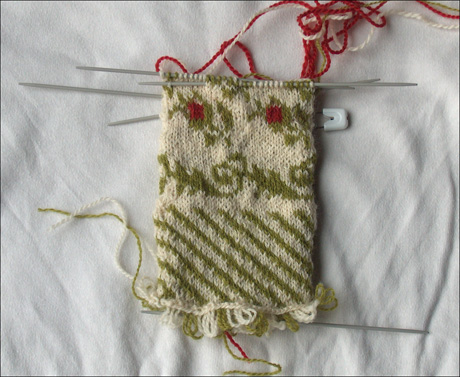
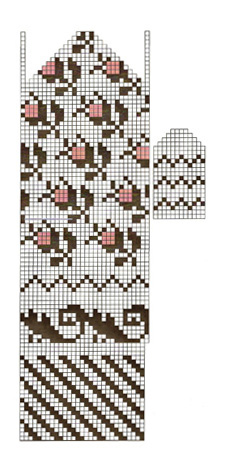
The swirling pattern above the diagonal coloured cuff is called ässänväärä, and is an old rococo pattern that also can be found on painted furniture in the same area. I haven't seen this pattern, as far as I can remember, on any other mittens than Finnish mittens from the Pohjanmaa area. Similar flower motifs as the rosebud, even if not exact the same, can be found in all of the Baltic Sea area, in Estonian, Swedish and Finnish mittens.

These mittens involve long strands on the inside of the mittens. This is an issue you have to decide how to deal with. First of all, you can weave in the yarn not in use. I don't like this method, since I can't do it without contorting the stitches, and having, especially when using colours so far from each as in this mitten, the yarn woven in to show up on the right side. The second option is to strand the yarn not in use on the backside. This will cause some difficulties when putting your hand into the mitten, you risk to be caught up in the strands with your fingers, and if the mitten is made for a child, this problem will be accentuated. As I see it, you have three ways to deal with the problem. You can use a thin yarn and knit an inner mitten, thin angora yarn for example would make a wonderful inner mitten for the hand part of the mitten. The inner mitten can be knitted loosely and be very open in its texture, the only aim of the inner mitten is to protect the strands from your fingers being caught up in them. The second option is to lightly felt the inner side of the mitten. This will happen naturally when you wear the mitten, and if you're careful enough, it might be the only thing you need to do. With these mittens I will go for a light felting, and hope it will be enough to protect the strands until the inside naturally felt up more. The third option is to do nothing, just being extremely careful when putting your hand in the mitten, and then hope for a fast self-felting.

Rosebudboth.jpg
Yarn: Vuorelma Satakieli or similar 2 ply 100% wool. I have used the colours 001 (off white), 491 (red) and 890 (green).
Needles: 2mm and 2,5 mm dpns.
Gauge: 36 stitches and 40 rows to make 10 x 10 cm (4" x 4")
Finished size: From fringe to top 25 cm, around the hand 17 cm (suitable for my 11 yo daughters hand).

Left hand mitten:

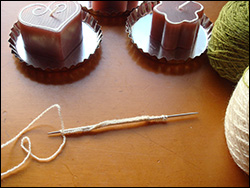
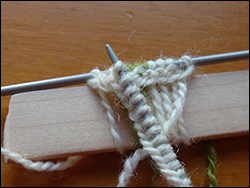
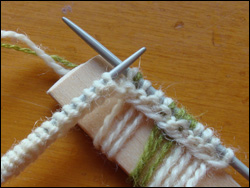
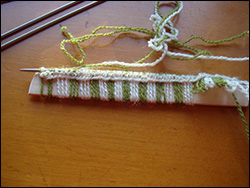
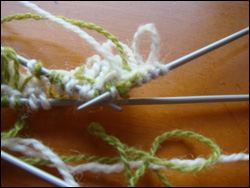
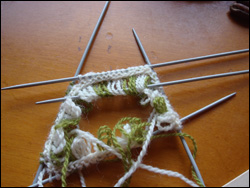
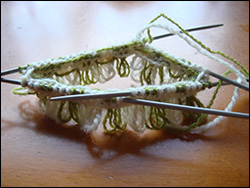
Cast on 60 stitches with 2mm needles. I have made a tutorial of how to do this fringe cast on with two colours in the way Mary Olki instructs to do it in her book "Kirjokintaita ja muita kansanomaisia neuletöitä" from 1950's. Cast on three stitches in green and two stitches in red. When you have finished the cast on, decrease on stitch on the first pattern row in order to get the stripes to overlap neatly. Start knitting according to the pattern. When you have finished the striped cuff, change to white and 2,5 mm needles and increase one stitch before starting the ässänväärä pattern. You have now 60 stitches on your needles, divided evenly on four dpns. Continue knitting according to the pattern.

Thumb: When you have finished the first row of rosebuds, knit 18 stitches according to the pattern. Knit 11 stitches with a waste yarn, then slip these 11 stitches back on the left needle and continue in pattern.

Rosebud chart.jpg
Shape top:
When half way through the fifth rosebud row (or when mitten reaches approx to the top of the little finger) start decreasing at the end of the second and beginning of the third needle. Slip the two last stitches on the second needle at once as if to knit, knit the first stitch on the third needle and pass the two slipped stitches over the knitted stitch. Leave the knitted stitch on the second needle. Two stitches decreased. Continue in pattern until the two last stitches on the fourth needle are left. I prefer to knit the last stitch before the decreases (the one that will be decreased on next row) in the same colour as the decrease will be, I think it makes the decreased stitches more even in colour, but you can knit the pattern until the last stitch if you want to. Continue decreasing this way until you have eight stitches left. Break the yarn, and thread it through the remaining stitches.

Thumb: Remove the waste yarn and pick up 11 stitches for the front and for he back of the thumb. Knit according to the pattern, but pick up one stitch in the beginning of the first and the third needle, you will now have 24 stitches on four needles. Two rows after the third zigzag row start the decreases for the top, using the same method as when decreasing for the top of the hand.

Right hand mitten:

Knit as the left hand mitten, but when you have knit the first rosebud row, knit 31 stitches before knitting 11 stitches with waste yarn for the thumb. The thumb will be knitted at the beginning of the third needle, when the left thumb was at the end of the second needle.

Download a sharper chart for the mittens here! Requires Excel.

Rosebud4.jpg
If you decide to knit these mittens, I would love to see pictures of your interpretation! Please leave a comment with a link, or email me! If you have problems understanding the pattern, feel free to contact me. You can reach me at mfast(at)welho.com (remove the () around @).


And remember! This pattern is for personal use only! You’re not allowed to sell or distribute it, or to sell mittens you have knitted from it. You can print a copy for your personal use, but for any other use of the pattern or any pictures in it, you must contact me and ask for permission. If you want to know more about copyright, you can take a look here: What is copyright protection?


October 29, 2007

In all their unblocked glory

Rosebud2.jpg

A first peak at the still unblocked Rosebud mittens. The weather has been terrible for several days, and it has not motivated me to block the mittens. But I have finished knitting them, and the pattern is written down. So, as soon as the mittens are blocked, the weather has brightened up some and my mitten model is ready for a photo shooting, you’ll have more pictures AND a pattern for these mittens.

January 07, 2007

The finished Rosebud mittens and new WIP

Today was another grey and cloudy day, not the sunshine I had hoped for in order to take beautiful pictures of the finished Rosebud mittens. And what more, there will be no modelled pictures of the mittens. The younger daughter, who has petit hands, has too big hands for them. The mittens were simply too small, something I had slightly anticipated. The good thing is that my niece, even if she is only three, has quite big hands, and will soon be able to wear them. She is having birthday very soon, and I’m still not sure of what more than the mittens to give her in order to manifest my place as aunt of the year (ok, I’m her only aunt, but still, you should never underestimate nieces).

DSC01215.JPG

I followed more or less the pattern by Eeva Haavisto in her book Sata kansanomaista kuviokudinmallia; there are some small tweaks in the flower pattern in order not to have to twist the yarn so many times on the backside. And the thumbs are patterned according to the mitten I saw in the National museums collection. The green colour is also from the museum mitten pair, Eeva Haavisto’s pattern was knitted in black, white and red.

DSC01216.JPG

Project details:
Pattern: A combination of the mittens with rosebuds from Kurikka in Eeva Haavisto’s book Sata kansanomaista kuviokudinmallia and a pair of mittens in the National Museums collection, from Ilmajoki (both places are in Pohjanmaa, about 15 kilometres apart).
Yarn: White and red Vuorelma’s Satakieli, green Isager’s Tvinni.
Needles: 2mm dpns.
Gauge: 40 stitches and 43 rows to 10 x 10 cm.

DSC01218.JPG

The new project I started just before New Year is the Paws and whiskers socks by Theresa, but over here known as the Nino socks, or for the memory of a world fine hamster. The yarn Theresa used for these cat inspired socks was very much in colour with our beloved hamster Nino, who died in November, and I instantly saw her whiskers and paws in the pattern. I decided to knit the younger daughter a pair of Nino socks, initially intended as a Christmas gift, but delayed by other things going on around.

DSC01220.JPG

I had first in mind to omit the edge Theresa had made and simply make a ribbed cuff, but changed my mind in the last minute. I now have to sew the edge to the inside (and the inside will be ribbed, but that doesn’t matter). I have reached the heel, almost, and I must say it is a pattern that looks much more complicated than what it is. It’s not mindless knitting, but it is fun and easy knitting. Well done job with the pattern Theresa!

December 31, 2006

Happy New Year!

I wish you all and everybody a Happy New Year 2007, with lot of quality knitting time and fabulous yarns, but most of all, with health and happiness.

I managed to finish two knits between Christmas and New Years Eve, and here will follow short glimpses of them. A more detailed post with modelled pictures of the mittens will be here next year.

HPIM7370.JPG

Fresh on the blocking board, the Rosebud mittens.

I managed to finish the thumbs of the Rosebud mittens yesterday evening, and they are now resting on the blocking board. They were before blocking sticking like gloves to my daughter’s hands, it will be interesting to see if the quite brutal blocking will gain a centimetre or two, and they would be welcome. If not, then they will go to my niece, who is three and has lot of time to grow into them.

HPIM7371.JPG

Posing in front of the Christmas tree.

I started and finished a pair of Jaywalkers. Actually I started them before Christmas, but never came around to blog about them. The yarn is the Regia 4fädig Mini ringel colour self-striping yarn that I got from my Secret Pal this autumn, knit on 2.25 mm needles. I'm not in love with the pattern, it was a bit boring, but my older daughter loves them. The colours were also more me when the yarn was in the ball, knitted up they are brighter than I prefer.

Plans for the new year? A pair of mittens for my son and a pair of socks for the younger daughter, but more than that is not scheduled. The spring will be busy, in a good way, and I'm afraid my knitting time will be even less than it has been in the autumn. A Solveig Hisdal sweater is on the dream-list, but I must think about that project more, I want to have some shaping in the sweater.

Thank you for reading my blog and thank you to everyone who has left a comment. I try to answer the comments, but sometimes will time be short, and answering left out. Anyway, thank you all! It has been a fun year, this first blog year! See you in 2007!

December 17, 2006

The second Rosebud mitten is started, and FO Pomatomus socks.

The weather in the south of Finland has been grey and rainy for days. Yesterday did it clear up, so I hauled out yarn and needles for the second Rosebud mitten. I have longed to start the second mitten for some time already, but wanted to include a short tutorial on how to make the fringe at the beginning of the mitten. The weather and not good enough camera flashes have prevented me from starting them until now. This is the way Mary Olki teaching to cast on a fringe on a traditional Finnish mitten. The directions are from 1950’s, and can be found in her book Kirjokintaita ja muita kansanomaisia neuletöitä

DSC00919.JPG Cast on the required amount of stitches.
DSC00921.JPG After knitting one stitch, move the yarn around a flat piece of wood or plastic, from the front to the back.
DSC00923.JPG After two stitches and three loops in one colour, knit the next stitch with both colours, and make the next loop with the new colour.
DSC00929.JPG All cast on stitches are knitted and fringed. Remove the wooden measure.
DSC00930.JPG Knit next row with the main colour. Knit every stitch trough the stitch and the underlying stitch from the cast on row.
DSC00931.JPG After the first row, straight out all the fringes by inserting a needle trough the loops and gently thug them down.
DSC00932.JPG Continue knitting in pattern.


This week was disturbed knitting wise by an exam, but the Pomatomus socks were finished and blocked in the beginning of the week. They are warm and nice to wear, and I like them a lot. The yarn, Piece of Beauty’s Robe&Bowl yarn is so soft and nice in the hands. It lost a little bit of red dye in the wash, but not enough to change the colours visible.

HPIM7355.JPG

The colour is off as usual with flash. This yarn is not flash friendly!

Project details:
Pattern: Pomatomus by Cookie A. for Knitty
Yarn: Piece of Beauty 100 % wool in the colour Robe & Bowl, 85 grams.
Needles: 2,75 mm dpns.
Alterations: I did only two pattern repeats in the leg part of the socks.

DSC00933.JPG

And more miniatures: The bears got a scarf from the rest 15 grams of the Piece of Beauty yarn. Pattern: Shifting sand by Grumperina. Needles: 2 mm. If you cable without cable needle, try it out! It is a fun pattern, and easy to knit.

October 29, 2006

Modelled Haruha pics and progress on the Rosebud mittens

We had pretty hard winds here yesterday, but nothing happened on our yard, no fallen trees or such. The good thing was that all the oak leaves were thrown from the tree by the winds, so we spent Sunday collecting leaves and taking them to the compost heap. The work went so well that I almost forgot to take pictures of my finished Haruhas.

HPIM7273.JPG

I did knit them with my winter coat in mind, you see those slits? They can be pretty cold when the wind is whirling around one's arms. The Haruhas are much longer than the pattern model, just because I wanted them to cover my lower arms. I will of course also wear gloves, but my gloves are just and just reaching the end of the slits, and from there on will the Haruha take over. But I think they will be pretty useful in cold libraries too.

HPIM7255.JPG

Project details
Pattern: Haruha by Kristel Nyberg for Ulla neulelehti.
Yarn: 100 % wool from Greece, given to me by my still very Secret Pal.
Needles: 3 mm.
Alterations: I did knit them longer. There are four medallions on the cuff of the model, I have seven.

See all entries on Haruha.

HPIM7278.JPG

And there has been some progress made on the Rosebud mittens too. They look even more uneven than in real life, sight. But they will even out after a good soak and blocking, I know. The Bayrische socks are also coming along nicely, but I forgot to take a picture before it got too dark for it. Another day, friends.

All this knitting on small needles has made me long for a bigger needle project. With father's day coming up, I'm thinking about a Sharfik by Grumperina in lovely soft Jaeger Extrafine Merino and 4 mm needles. And I do still have some Rowan Linen Drape, that would need to be knit up on about 3,5 mm. The two balls in light lilac would make a lovely shawl for my younger daughter, but what to do with 5 balls in dark purple. A top would be one solution, but I'm open for ideas.

October 09, 2006

Mittens in progress

The new Satakieli yarns have been very tempting on the needles, and I have knitted way more than I should this weekend. One reason has been watching football, there is not so much to do when the girls are warming up, except to knit. The tournament went well, the girls won two games and played one even.

HPIM7222.JPG

This is the basket weave mitten, knit with the blue green Satakieli and after a suggestion from Memmu, with golden Satakieli as contrast colour. Sofia, the younger daughter, saw these mittens, and forgot everything about what she had wanted before. Her mitten world was filled with this mitten. And that was a good thing, since what I hadn't taken into consideration was that being knit with three strands of yarn the mitten will be significantly smaller than when knit with two strands of yarn. Sofia's hand was the only one in the family that would fit into this mitten. Being knitted with three strands of yarn will also make them warmer than when knitted with only two.

The pattern is from Eeva Haavisto's book Sata kansanomaista kuviokudinmallia, and she gives the credits for the pattern once again, to Jalasjärvi. Her original was knitted in black, with red as contrast and white as background. Must be a quite impressive combination! The cuff is very long, a good thing for a mitten made for a very mobile child. Knitting with three strands is a bit trickier than knitting with only two, but the result is quite nice. Do you want to have a close up? Click away and you'll get it!

HPIM7221.JPG

These are the mittens I had already started for Sofia. The white and red yarns are Satakieli, the green Isager Tvinni, bought some time ago in Copenhagen. The pattern is one that you can find as well in Eeva Haavisto's book as on a pair of mittens in the National Museum collection of old Finnish mittens. Haavisto says her model is from Kurikka, and it is knitted in white, black and red. The model in the museum collection is knitted in green, red and white, and is said to be from Ilmajoki. Kurikka and Ilmajoki are about 15 kilometres from each, and the distance from Kurikka to Jalasjärvi is about 25 kilometres. So we are moving on a very small area in the south of Pohjanmaa here. I haven't seen the model in the museum collection personally, only a picture of it, and I think the cuff was made in a little different way, it looked like it had more structure in it. I can't swear either that the pattern is exactly like what I have knitted. The museum picture has been my inspiration, but I have used Haavisto's pattern for the mitten. The lower pattern, above the cuff, is called "ässänväärä", and is a pattern that is used in several different art forms in Pohjanmaa, for example on painted furniture. It's a typical rococo ornament, and believed to have come to Pohjanmaa from Sweden. The flowers above the ässänväärä are looking like rosebuds, so I call the mittens rosebud mittens.

On both of these mittens is the thumb made as I think they were made before in Finland. It's a straight thumb, with the thumb stitches stored away on a tread, and new stitches casted on above (this is by the way my grandmother taught me to knit mittens eons ago). I did cast them on in the colours that would have been used for the stitches; I don't know how much it will matter when the stitches are picked up. The tops of the mittens will be finished in two different ways, more on that in next post on the mittens.

LuddeVenezia.jpg

Welcome to my blog! My name is Maud, and I spend my free hours grooming Afghan hounds, knitting, cooking, and growing bonsai trees. I am since the summer of 2012 reporting from Stockholm Sweden, entries before that are from Esbo, Finland.

My knitting projects in Ravelry


How To

Galleries

Finished in 2012

Finished in 2010

Finished in 2008

Finished in 2007

Finished in 2006


Search


All content copyright 2006-2007 by Maud. All rights reserved. What is copyright?

Powered by
Movable Type 3.2